
Your requirements documents already contain the blueprint for your load tests. Most teams never unlock it. Here’s how Cavisson’s AI changes that equation.
70%
reduction in test authoring time
3×
faster test coverage across services
90%
of PRD perf criteria captured automatically
The gap between requirements and reality
Product requirement documents are not test plans. But they contain the raw ingredients for one — in the form of performance intent. Words like “must handle,” “shall not exceed,” “during peak hours,” and “at the 99th percentile” are testable assertions wearing the clothes of business language. The problem is the translation layer. Converting that language into a functioning load scenario — with the right virtual user count, ramp-up curve, threshold conditions, and assertion logic — has historically been a manual, time-consuming process. For a mid-size release with 12–15 performance-sensitive flows, this could easily consume two to three engineering days before a single test actually runs.| The real bottleneck isn’t writing tests. It’s knowing what tests to write, with what parameters, based on what requirements. That’s where AI changes everything. |
What Cavisson’s AI actually does with your PRD
Cavisson’s AI-powered test authoring pipeline accepts uploaded requirement documents in PDF, DOCX, or plain text. What happens next is not keyword matching or template filling — it’s contextual parsing of natural language performance intent.
Inside the interface: what it actually looks like
Before getting into the mechanics, let’s ground this in reality. Here’s Cavisson’s “Generate Functional Test Cases” screen — the starting point for the entire PRD-to-test pipeline:
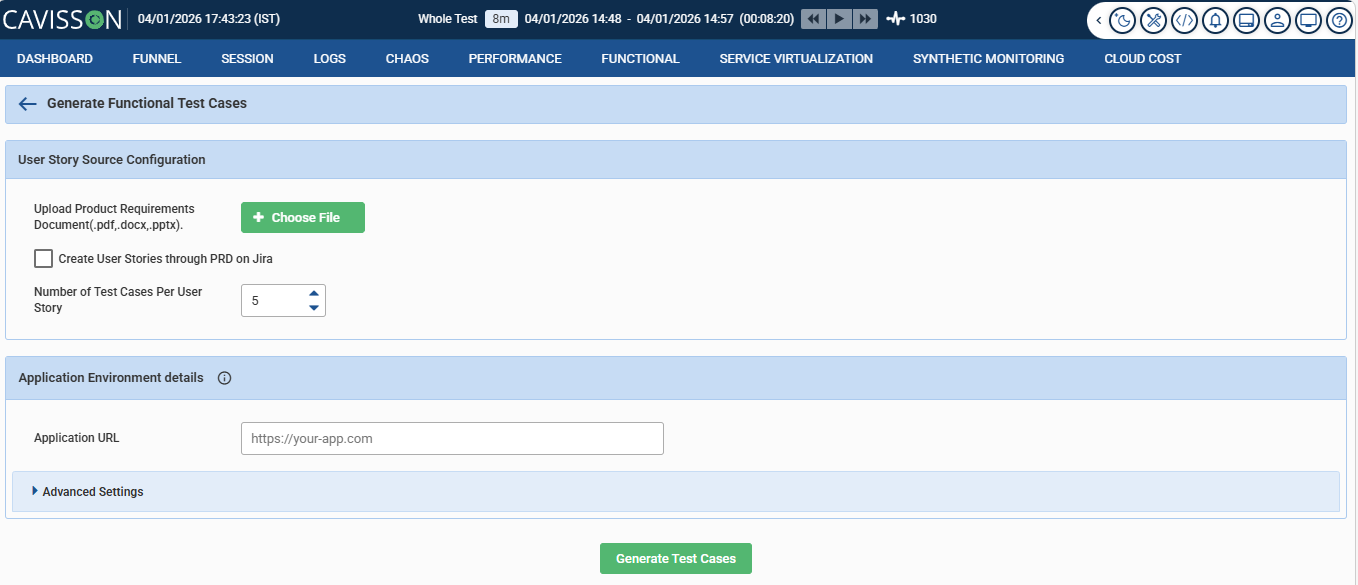
Deceptively simple. Three fields, one button. But the simplicity is the point — it hides a significant amount of intelligence behind a workflow that any QA engineer or product manager can operate without writing a single line of test script.
Here’s what each piece of this interface is actually doing:
1 Document upload — PDF, DOCX, or PPTX The AI accepts your requirements document in whatever format it exists in. No pre-processing, no reformatting required. A Confluence export, a product spec deck, or a raw BRD — it handles all three. The engine parses natural language, not structured markup.
2 Jira integration — create user stories directly from PRD This checkbox is quietly powerful. With it enabled, the AI doesn’t just extract test cases — it creates the corresponding Jira user stories first, then generates tests against them. Your PRD populates your backlog and your test suite in a single pass. For teams running agile cycles, this closes a loop that usually requires two separate manual steps.
3 Test cases per user story — configurable coverage depth Set to 5 by default, this control lets teams balance thoroughness against noise. A critical payment flow might warrant 8–10 test cases covering edge conditions; a low-risk configuration page might only need 3. The number you set here shapes how exhaustively the AI covers each extracted requirement.
4 Application URL — environment targeting The AI doesn’t generate tests in a vacuum. By knowing the target application URL, it can orient generated scenarios to the actual environment — staging, pre-prod, or production — without manual reconfiguration between runs.
5 Advanced settings — load profiles, thresholds, and more For teams that want finer control, the collapsible Advanced Settings panel exposes concurrency parameters, ramp-up duration, SLA thresholds, and assertion configurations. Default values are intelligently inferred from the PRD; advanced settings let engineers override them where judgment calls are needed.
What the AI does under the hood
Clicking “Generate Test Cases” kicks off a pipeline that’s doing considerably more than keyword matching. Cavisson’s AI processes the uploaded document in three distinct stages:
1 Requirement extraction: The engine scans for performance intent — latency targets, concurrency figures, SLA language, throughput expectations. It distinguishes between hard requirements (“must not exceed”) and soft targets (“should aim for”), treating each differently in the test output.
2 Scenario mapping: Each extracted requirement is mapped to a user journey or endpoint. The AI groups related requirements into coherent test scenarios, avoiding the fragmentation that comes from treating every sentence in isolation.
3 Test case generation: For each scenario, the AI produces the configured number of test cases — covering happy paths, boundary conditions, and failure modes. Thresholds are tied directly to the requirement language, not guessed. The output is a review-ready test suite, not a draft that needs to be rebuilt from scratch.
Before and after: what the workflow actually looks like
Without AI | With Cavisson AI |
—The engineer reads the full PRD manually —Performance criteria extracted by memory —Test scripts built from scratch per flow —Thresholds based on estimates or guesswork —2–3 days to full coverage on a standard release —Requirements drift goes undetected | +PRD uploaded, parsed in minutes +All testable assertions auto-extracted +Scenarios generated with load profiles attached +Thresholds tied directly to stated SLA language +Same coverage achieved in hours, not days +PRD re-parse flags new or changed conditions |
“The best performance test is the one that actually reflects what the business promised — not what the engineer remembered.”
Where the Optimization Comes From
The optimization deserves some unpacking, because it’s not a rounding of anecdotes. It reflects three specific time sinks that AI eliminates:
Requirement discovery — finding and cataloguing all performance-relevant statements across a document — typically accounts for 25–30% of authoring time on large PRDs. This is now automated.
Parameter derivation — translating business language like “peak hour traffic” into concrete load model numbers — accounts for another 20–25%. Cavisson’s AI doesn’t just extract what was written; it interprets the implied load model and populates defaults that engineers can then tune.
Threshold configuration — mapping each scenario to pass/fail criteria that actually reflect business intent rather than arbitrary numbers — contributes the final 15–20%. When requirements explicitly state an SLA, the test reflects it exactly. No estimation, no translation error.
Not just faster — more faithful
Speed is the obvious benefit. But there’s something more important at stake: fidelity. Manual test authoring introduces interpretation drift. Two engineers given the same PRD will produce meaningfully different tests — different load shapes, different thresholds, different definitions of “peak.” Over time, this drift compounds until your test suite no longer reflects your product’s real performance commitments.
When tests are derived directly from requirements documents, they stay anchored to what was actually specified. When the PRD changes, the tests change with it. This creates a traceable, auditable link between business intent and engineering validation — something most organizations currently lack entirely.
Practical use cases where this matters most
🛒 E-commerce platforms Peak-season SLAs scattered across product and ops PRDs — auto-mapped to Black Friday load profiles. | 🏦 Financial services Regulatory and compliance documents often embed latency and throughput requirements. AI extracts and tests them. | ⚕️ Healthcare systems BRDs for patient-facing portals frequently carry response time mandates. Manual extraction is error-prone. | 📡 SaaS & APIs API contracts with latency SLAs become test suites automatically — keeping tests and contracts in sync. |
AI does the first draft. Engineers make the final call.
AI-generated test configurations are starting points, not finished artifacts. Cavisson’s interface is designed around engineer review: every extracted scenario, threshold, and load profile is visible and editable before it executes. The AI does the mechanical work; the engineer applies judgment where it matters.
This matters because some requirements are genuinely underspecified. A line like “the system should be fast during peak” doesn’t translate directly to a load model without contextual interpretation. The AI surfaces ambiguous conditions for human review rather than silently filling them with arbitrary defaults — which is exactly how it should work.
The practical result: teams report being able to begin meaningful performance validation earlier in the sprint cycle — often before a sprint’s development work is complete. The shift from “test at the end” to “test continuously” stops being aspirational and becomes operationally viable.
See it working on your own requirements
Upload a PRD or BRD and watch Cavisson extract your performance test scenarios in real time.